16 December 2012

Evacuating VMs and Templates From Datastores

In many environments, ours included, it is not always possible or desired to store all of a VM's virtual disks on the same datastore.  For example, the storage performance may not be ideal if the VM has high I/O requirements, you may have a policy to keep database logs on separate datastores from the actual data files, or you might just have different tiers of storage for your OS disks vs. your data disks.  Whatever the rationale, it is somewhat troublesome if you need to evacuate the datastore for some reason, such as moving to a new storage array.  Why is this?  Consider the following scenario:


Let's assume DATASTORE1 is the datastore that needs to be evacuated in this example.  Initially, you may consider a simple Move-VM command such as this:

Get-Datastore DATASTORE1 | Get-VM | Move-VM -Datastore DATASTORE4

The problem with this command is that it will attempt to move all four VMs to DATASTORE4 but will fail because there isn't enough free space.  At first glance, you may be thinking "What are you talking about?  The VMs on DATASTORE1 only add up to 400GB and there is 500GB free on DATASTORE4!"  Well, the problem with the Move-VM cmdlet is that it will consolidate all the config files and virtual disks that make up a VM at the destination datastore.  If you take a closer look at the diagram, the total capacity needed to host all four VMs is actually 1.4TB.  So Move-VM is not an option here unless we get a larger datastore, but remember, there was a valid reason for splitting the virtual disks across multiple datastores, so we really don't want to lose the VMs' layout on this migration.

To the VMware (VMTN) Communities I went to begin researching this and big surprise, LucD had the answer for someone.  However, this solution had a few issues for us:

1) It does not move any templates that may be located on the datastore you are evacuating.  Surely you use templates, right?

2) It moves the VM's config files even if they are not on the datastore you are evacuating.  Not a huge deal, but some people like to keep the config files on the same datastore as the "OS disk" and this could break that.  For example, if we wanted to evacuate DATASTORE2 instead, VM2 would have not only its 500GB disk moved to the new datastore, but it would also grab the config files from DATASTORE1 as well, which might lead to some confusion since they now reside with the second virtual disk instead of the first (OS disk).

3) If the VM only has its config files stored on the datastore you are evacuating, then we've got a larger problem.  Let's go back to our original example.  We want to migrate the VMs on DATASTORE1 to DATASTORE4, but keep their existing layout so it all fits.  With the script from the Community, it'll work great except on VM3 (and sort of VM4, see above).  With VM3, only the config files are stored there, but because the script sets the "datastore" property of the VirtualMachineRelocateSpec object regardless of where the config files reside, it'll not only move those files, but also all virtual disks associated with that VM because the "disk" property is optional.  Think of it kind of like a "default datastore" to use for migrating the VM and its virtual disks so you don't need to bother specifying the destination datastore on each disk if you desire.  If you do the math on that, it'll move 400GB of virtual disks just for VM3.  That brings the total for all VMs on DATASTORE1 to 800GB, which again, will not fit on DATASTORE4.

So the fix for #3, of course, is to specify the destination datastore for each and every disk--either the new destination datastore if they need moved or the current datastore if they need to stay put.  This is done through the VirtualMachineRelocateSpec object's "disk" property, which is itself an array of VirtualMachineRelocateSpecDiskLocator objects.  Without further adieu, the final code looks like this:

<#
    .Description
    Script to evacuate virtual disks and/or VM config files from a given datastore; does not move the entire VM and all its disks if they reside elsewhere. Created 12-Dec-2012 by vNugglets.com.
    .Example
    EvacuateDatastore.ps1 -SourceDatastore datastoreToEvac -DestDatastore destinationDatastore

    Move virtual disks and/or VM config files (if any) from source datastore to the destination datastore
#>

## Params for source and destination datastore
param(
    ## The name of the source datastore (the one to evacuate).  Required.
    [parameter(Mandatory=$true)][string]$SourceDatastore_str,
    ## The name of the destination datastore.  Required.
    [parameter(Mandatory=$true)][string]$DestDatastore_str
) ## end parameter


## Set proper variable names from the supplied parameters
$strSrcDatastore = $SourceDatastore_str
$strDestDatastore = $DestDatastore_str

## Get the .NET view of the source datastore
$viewSrcDatastore = Get-View -ViewType Datastore -Property Name -Filter @{"Name" = "^${strSrcDatastore}$"}
## Get the linked view that contains the list of VMs on the source datastore
$viewSrcDatastore.UpdateViewData("Vm.Config.Files.VmPathName", "Vm.Config.Hardware.Device", "Vm.Config.Template", "Vm.Runtime.Host", "Vm.Name")
## Get the .NET view of the destination datastore
$viewDestDatastore = Get-View -ViewType Datastore -Property Name -Filter @{"Name" = "^${strDestDatastore}$"}
## Create a VirtualMachineMovePriority object for the RelocateVM task; 0 = defaultPriority, 1 = highPriority, 2 = lowPriority (per http://pubs.vmware.com/vsphere-51/index.jsp?topic=%2Fcom.vmware.wssdk.apiref.doc%2Fvim.VirtualMachine.MovePriority.html)
$specVMMovePriority = New-Object VMware.Vim.VirtualMachineMovePriority -Property @{"value__" = 1}
## Create empty arrays to track templates and VMs
$arrVMList = $arrTemplateList = @()

## For each VM managed object, sort into separate arrays based on whether it is a VM or a template
$viewSrcDatastore.LinkedView.Vm | % {
    ## If object is a template, add to template array
    if ($_.Config.Template -eq "True") {$arrTemplateList += $_}
    ## Else, add it to the VM array
    else {$arrVMList += $_}
}

## For each VM object, initiate the RelocateVM_Task() method; for each template object, initiate the RelocateVM() method
$arrVMList, $arrTemplateList | %{$_} | %{
    $viewVMToMove = $_
    ## Create a VirtualMachineRelocateSpec object for the RelocateVM task
    $specVMRelocate = New-Object Vmware.Vim.VirtualMachineRelocateSpec
    ## Create an array containing all the virtual disks for the current VM/template
    $arrVirtualDisks = $viewVMToMove.Config.Hardware.Device | ?{$_ -is [VMware.Vim.VirtualDisk]}
    ## If the VM/template's config files reside on the source datastore, set this to the destination datastore (if not specified, the config files are not moved)
    if ($viewVMToMove.Config.Files.VmPathName.Split("]")[0].Trim("[") -eq $strSrcDatastore) {
        $specVMRelocate.Datastore = $viewDestDatastore.MoRef
    } ## end if

    ## For each VirtualDisk for this VM/template, make a VirtualMachineRelocateSpecDiskLocator object (to move disks that are on the source datastore, and leave other disks on their current datastore)
    ## But first, make sure the VM/template actually has any disks
    if ($arrVirtualDisks) {
        foreach($oVirtualDisk in $arrVirtualDisks) {
            $oVMReloSpecDiskLocator = New-Object VMware.Vim.VirtualMachineRelocateSpecDiskLocator -Property @{
                ## If this virtual disk's filename matches the source datastore name, set the VMReloSpecDiskLocator Datastore property to the destination datastore's MoRef, else, set this property to the virtual disk's current datastore MoRef
                DataStore = if ($oVirtualDisk.Backing.Filename -match $strSrcDatastore) {$viewDestDatastore.MoRef} else {$oVirtualDisk.Backing.Datastore}
                DiskID = $oVirtualDisk.Key
            } ## end new-object
            $specVMRelocate.disk += $oVMReloSpecDiskLocator
        } ## end foreach
    } ## end if

    ## Determine if template or VM, then perform necessary relocation steps
    if ($viewVMToMove.Config.Template -eq "True") {
        ## Gather necessary objects to mark template as a VM (VMHost where template currently resides and default, root resource pool of the cluster)
        $viewTemplateVMHost = Get-View -Id $_.Runtime.Host -Property Parent
        $viewTemplateResPool = Get-View -ViewType ResourcePool -Property Name -SearchRoot $viewTemplateVMHost.Parent -Filter @{"Name" = "^Resources$"}
        ## Mark the template as a VM
        $_.MarkAsVirtualMachine($viewTemplateResPool.MoRef, $viewTemplateVMHost.MoRef)
        ## Relocate the template synchronously (i.e. one at a time)
        $viewVMToMove.RelocateVM($specVMRelocate, $specVMMovePriority)
        ## Convert VM back to template
        $viewVMToMove.MarkAsTemplate()
    }
    else {
        ## Initiate the RelocateVM task (asynchronously)
        $viewVMToMove.RelocateVM_Task($specVMRelocate, $specVMMovePriority)
    }
} ## end foreach-object

To use the script, you'll need to provide the source and destination datastore as parameters as such:

PS vNuggs:\> .\EvacuateDatastore.ps1 -SourceDatastore DATASTORE1 -DestDatastore DATASTORE4

Many of the comments in the code are self-explanatory, but here are some additional details around the more important/complex parts:

Lines 35-40: In this section, we determine whether the objects from the datastore's linked view are standard VM managed objects or whether they are actually a template and put them into separate arrays.

Line 43: This is where we pipe the two arrays into a ForEach-Object loop to start the process of gathering the necessary data to relocate the VM/template to the new datastore.  We chose to begin with the VMs first because we eventually want to kick them off as vCenter tasks so that we can then focus on the templates.

Line 50: This is the part that combats problem #2 above.  Here, we parse the datastore name out of the fully-qualified path to the VM/template's config file and if it matches the source datastore, then that's the only time we set the "datastore" property of the VirtualMachineRelocateSpec object to the destination datastore as that's the only time we want to move the config files.

Lines 56-65: Now the VirtualMachineRelocateSpecDiskLocator object is populated accordingly--if the disk is on the source datastore, then its "datastore" property is set to the destination datastore so it gets moved, otherwise it is set to its current datastore so it does not get moved.  Line 63 adds it to the "disk" property of the VirtualMachineRelocateSpec object and everything repeats for the next disk if more exist.

Lines 68-78: On line 68 we have to check if the current VM object is really a VM or a template, even though we already did this earlier.  This is better than having to duplicate all the code from lines 43-65, however.  Then lines 70-73 are how we deal with problem #1 from above.  Since we determined this object was a template, we must convert it to a VM in order to relocate it to a different datastore.  It is a shame VMware still doesn't allow us to move templates for some reason.  Finally, line 75 calls the RelocateVM() method of the VM managed object and begins the relocation.  It is important to note that this occurs in a synchronous manner (i.e. one template at a time).  As you'll see in the next section, we don't do this if it is a VM object, but we really have no choice when dealing with templates because we need to wait for the relocation to complete before we can convert the VM back to a template.  This occurs on line 77.

Lines 79-82: In this section, namely line 81, we call the RelocateVM_Task() method this time since this object is a VM, not a template.  This way we kick off "RelocateVM" tasks asynchronously and let vCenter decide how many it can handle at once, which as of vSphere 5.0 and 5.1 is eight per datastore and two per host.  In addition, we piped the VM objects into the loop first so that we could kick them all off and then focus on the templates one by one.  But, if you are concerned that your storage array won't be able to handle the load of multiple storage migrations, simply change line 81 to look like line 75 and it'll behave synchronously like the templates do.

If you've read this far, you may be wondering what use this sort of script has in the world of SDRS (Storage DRS).  Yes, SDRS has features like datastore maintenance mode that would prevent the need for some of this type of work, but not everyone has SDRS available to them; either because they haven't found the time to implement it yet, haven't upgraded to vSphere 5.x yet, or just don't own the Enterprise Plus edition, so this script is likely to be of use to many people still. We hope so.

02 October 2012

VMHost Logical Drive Info from CIM Provider with PowerCLI

Joe at filippello.com was grabbing some Logical Volume info for local disks on VMware hosts he was building in his post "Frustrated with fast booting hardware?".  He realized that, rather than going to the RAID controller setup and viewing the logical volume info, the CIM provider is nice enough to provide that info, and vCenter displays it on the Hardware Status tab for the host.

We wanted to get that info for lots of hosts instead of one at a time in the vSphere client, so I checked into the properties of the HostSystem. The CIM provider tells about the logical volumes.  vSphere presents this in the Runtime.HealthSystemRuntime.HardwareStatusInfo.StorageStatusInfo property.  For the HP hosts I used, this property also holds info about each individual local disk, the array controller(s), and their battery.  So, if you are looking for such info, this is a good property to explore.  But, back to the topic at hand.

The function:
<# .Description
    Get logical volume info for HP VMHosts from StorageStatusInfo of their managed objects. Depends on CIM provider being installed and in good health (responsive and whatnot), presumably
    Author:  vNugglets.com -- Aug 2012
#>
function Get-VNVMHostLogicalVolumeInfo {
    param(
        ## name of VMHost to check; if none, queries all hosts
        [string]$VMHostName_str
    ) ## end param

    ## make the Get-View expression to invoke
    $strGetViewExpr = 'Get-View -ViewType HostSystem -Property Name,Runtime.HealthSystemRuntime.HardwareStatusInfo.StorageStatusInfo'
    if ($VMHostName_str) {$strGetViewExpr += " -Filter @{'Name' = '$VMHostName_str'}"}
    Invoke-Expression $strGetViewExpr | Select name,
        @{n="logicalVol"; 
        e={($_.Runtime.HealthSystemRuntime.HardwareStatusInfo.StorageStatusInfo | `
            ?{$_.Name -like "Logical*"} | %{$_.Name}) -join ", "}}
} ## end function

Some example usage:
## for one host
PS vNuggs:> Get-VNVMHostLogicalVolumeInfo.ps1 -VMHostName devhost0323.mydomain.com

Name                        logicalVol
----                        ----------
devhost0323.mydomain.com    Logical Volume 1 on HPSA1 : RAID 1 : 136GB : Disk 1,2,3


## for all hosts, call with no parameter
PS vNuggs:> Get-VNVMHostLogicalVolumeInfo.ps1

Name                        logicalVol
----                        ----------
devhost0323.mydomain.com    Logical Volume 1 on HPSA1 : RAID 1 : 136GB : Disk 1,2,3
devhost4323.mydomain.com    Logical Volume 1 on HPSA1 : RAID 1 : 136GB : Disk 1,2,3
devhost1.mydomain.com       Logical Volume 1 on HPSA1 : RAID 1 : 136GB : Disk 1,2,3
devhost27.our.domain.com    Logical Volume 1 on HPSA1 : RAID 1 : 68GB : Disk 1,2
devhost2.our.domain.com     Logical Volume 1 on HPSA1 : RAID 1 : 68GB : Disk 1,2
devhost743.our.domain.com   Logical Volume 1 on HPSA1 : RAID 1 : 68GB : Disk 1,2
devhost31111.our.domain.com Logical Volume 1 on HPSA1 : RAID 1 : 68GB : Disk 1,2
devhost21.our.domain.com    Logical Volume 1 on HPSA1 : RAID 1 : 68GB : Disk 1,2
devhost431.our.domain.com   Logical Volume 1 on HPSA1 : RAID 1 : 68GB : Disk 1,2
devhost3.mydomain.com       Logical Volume 1 on HPSA1 : RAID 1 : 68GB : Disk 1,2
devhost30.mydomain.com      Logical Volume 1 on HPSA1 : RAID 1 : 68GB : Disk 1,2
devhost.mydomain.com        Logical Volume 1 on HPSA1 : RAID 1 : 68GB : Disk 1,2, Logical Volume 2 on HPSA1 : RAID 1 : 68GB : Disk 3,4
devhost122.mydomain.com     Logical Volume 1 on HPSA1 : RAID 1 : 136GB : Disk 1,2
...

And, an example of using some of the other info returned by the CIM provider:  if you were to change the ?{$_.Name -like "Logical*"} in the above function (line 17) to ?{$_.Name -like "Disk*"}, you could get just the local disks' info (instead of info on the logical volumes):
...
Disk 1 on HPSA1 : Port 1I Box 1 Bay 1 : 136GB : Data Disk, Disk 2 on HPSA1 : Port 1I Box 1 Bay 2 : 136GB : Data Disk, Disk 3 on HPSA1 : Port 1I Box 1 Bay 3 : 136GB : Spare Disk
...
Enjoy.

28 August 2012

Even Faster PowerCLI Code with Get-View, UpdateViewData() and LinkedViews

We are always looking for speed, speed, speed in our PowerShell / PowerCLI scripts.  When properly used, the Get-View cmdlet is known to be far faster than using other PowerCLI cmdlets for getting info (such as Get-VM, Get-VMHost, Get-Datastore, etc.).  It can take quite a bit longer to write a script using Get-View versus using other cmdlets, but the speed payoff is usually well worth the additional upfront time investement.  VMware has provided a way to speed things up even more.

A while back (Aug 2011), the official PowerCLI blog had a post about how to "Optimize the performance of PowerCLI's views".  The technique is centered around using the UpdateViewData() method of a "view" of a managed object (".NET View object") to retrieve nested views of managed objects.

The UpdateViewData() method had already been able to selectively update properties of the given managed object view, but one would have to use Get-View again to retrieve views of nested managed objects that are properties of that parent managed object.  "So, what?"  So, speed!

Example 0:  Get guest IP info for VMs using given VM network

Say you wanted to get the IPs configured on VMs that are connected to particular VM networks.  This example goes about doing so by getting said network(s), getting the VMs connected to them, and then getting guest IP info.

You could use the following standard way using multiple Get-View calls:
## the network name pattern to use for getting vitual networks
$strNetworkNamePattern = "MyVMNetwork1711"
## get the virtual networks whose name match this pattern
$arrNetworkViews = Get-View -ViewType Network -Property Name,VM -Filter @{"Name" = $strNetworkNamePattern}

## get the VM managed objects with a couple of properties
$arrVMsUsingThis = $arrNetworkViews | ?{$_.Vm -ne $null} | %{Get-View -Property Name,Guest.Net $_.Vm}

## get info about IPs used on this/these network(s)
$arrVMsUsingThis | %{
   $strVMName = $_.Name
   ## for each Guest.Net where the network name is like the given network name
   $_.Guest.Net | ?{$_.Network -like "*$strNetworkNamePattern*"} | %{
       ## get IPs
       $_.IpAddress | %{
           New-Object -TypeName PSObject -Property @{
               VMName = $strVMName
               IPAddr = $_
           } ## end new-object
       } ## end %
   } ## end %
} ## end %

Or, using the UpdateViewData() method, the code would be:
## the network name pattern to use for getting vitual networks
$strNetworkNamePattern = "MyVMNetwork1711"
## get the virtual networks whose name match this pattern
$arrNetworkViews = Get-View -ViewType Network -Property Name -Filter @{"Name" = $strNetworkNamePattern}

## get a couple of properties for the VMs using this network
$arrNetworkViews | %{$_.UpdateViewData("VM.Name","VM.Guest.Net")}

## get info about IPs used on this/these network(s)
$arrNetworkViews | %{$_.LinkedView.Vm} | %{
   $strVMName = $_.Name
   ## for each Guest.Net where the network name is like the given network name
   $_.Guest.Net | ?{$_.Network -like "*$strNetworkNamePattern*"} | %{
       ## get IPs
       $_.IpAddress | %{
           New-Object -TypeName PSObject -Property @{
               VMName = $strVMName
               IPAddr = $_
           } ## end new-object
       } ## end %
   } ## end %
} ## end %
The only slight differences in the code in the two ways:
  • Line 04 in each:  the first way gets an additional property, "VM", for later use
  • Line 07 in each:  the first way uses and additional Get-View call, whereas the second way uses the UpdateViewData() method
  • Line 10 in each:  both access an array of VMs connected to the given VM network, but getting to those VM arrays is a touch different (the "LinkedView" property in the second way is due to having used the UpdateViewData() method)
This runs reasonably quickly both ways when just getting information for VMs on one VM network.  But, to really illustrate the potential speed increases, I tested the main difference (line 07) with not just one or two networks, but with about 30 networks and with about 160 networks.  The results are impressive.  Again, this was measuring just the central point of each way:  the amount of time for the code on line 07 in each way above to get the VM info from vCenter (first via an additional Get-View, and then via UpdateViewData()).

Get-View vs. UpdateViewData() -- Speed testing results in a couple of different environment sizes:
Method usedNum. networksNum. netwk connectionsTime to run (sec)Total Get-View calls
additional Get-View call3343295.334
UpdateViewData()334327.751
additional Get-View call1593705811.4160
UpdateViewData()159370539.611

Mhmm.  7.75 seconds vs. 95.3 seconds in a small-ish environment -- more than twelve (12) times faster for UpdateViewData().  And 40 seconds vs. 811 seconds in a larger environment -- more than twenty (20) times faster!

Example 1:  Get VMHosts' FirewallSystems to refresh firewall info

Another example.  AC recently had needed to refresh the VMHost firewall info on hosts.  This stemmed from a bug that AC ran into in which the host firewall info is gathered during the host boot process before the firewall services are fully initiated.

Next is the overall code for each way, and then some speed comparisons of each method.  Note, we originally wrote this to only refresh firewall info for VMHosts in one cluster at a time, but to have a bit larger set of operations so as to better illustrate the speed differences, the following code performs the actions for all clusters, one cluster at a time.

Traditional way, using multiple Get-View calls:
## get the Cluster managed objects
Get-View -ViewType ClusterComputeResource -Property Name,Host | %{
   ## get all of this cluster's HostSystem managed objects
   $arrHostViews = Get-View $_.Host -Property ConfigManager.FirewallSystem
   ## for each host in the given cluster, get the FirewallSystem managed object
   foreach ($viewHost in $arrHostViews) {
       $viewFirewallSystem = Get-View $viewHost.ConfigManager.FirewallSystem -Property FirewallInfo.DefaultPolicy
       ## call RefreshFirewall() method for this host's FirewallSystem
       $viewFirewallSystem.RefreshFirewall()
   } ## end %
} ## end %

And, the UpdateViewData() way:
## get the Cluster managed objects
$arrClusterViews = Get-View -ViewType ClusterComputeResource -Property Name
## update the .NET View data with a select FirewallSystem sub-property
$arrClusterViews | %{$_.UpdateViewData("Host.ConfigManager.FirewallSystem.FirewallInfo.DefaultPolicy")}
## for each host in the given cluster, call RefreshFirewall() method
$arrClusterViews | %{$_.LinkedView.Host} | % {$_.ConfigManager.LinkedView.FirewallSystem.RefreshFirewall()}

The differences in code between the two ways:
  • Lines 04-07 in 1st way vs. Line 04 in 2nd way:  The first way uses the standard way of additionally calling Get-View for each cluster to get the HostSystems, and then again for each HostSystem to get the FirewallSystem objects.  The second way uses one UpdateViewData() call to make the FirewallSystem managed objects available from the original array of cluster managed objects.
To see the speed differences for the main info-gathering portion of each way, I measured these two pieces mentioned above:  lines 04-07 for the first way, and line 04 for the second way.  UpdateViewData() wins.

Get-View vs. UpdateViewData() -- Speed testing results in a couple of different environment sizes:
Method usedNum. clustersNum. HostSystemsTime to run (sec)Total Get-View calls
additional Get-View5219.4727
UpdateViewData()5211.391
additional Get-View 3619170.85228
UpdateViewData()361918.201


The speed gain comes, in part, from the sheer number of calls being made that require a round trip request to the given vCenter server(s).  To get additional managed object info using Get-View, there is a Get-View call involved for every [group of] managed object references (MORefs).  Conversely, there is but one (1) call to communicate with vCenter for all "child" managed objects involved when UpdateViewData() is used.

This is not the most obvious route at first, but eventually you can see how to use the method to update managed object view data, and then access the nested managed objects' views using "LinkedView" objects that then reside "in" the parent managed object as properties.

The reward for successfully employing the technique:  speed.  The PowerCLI blog post reports a 100x speed increase in the given example versus using multiple Get-View calls to get nested managed object views.  100x -- that is speeding up a script that takes five (5) minutes to take only three (3) seconds -- FaF!  This speed increase varies based on how many Get-View calls are saved/avoided, what they are retrieving, etc, but that kind of potential speed gain demands attention.

For some further info:  I used this technique in a VMware communities thread about VM portgroup inventory (yes -- December 2011; it has taken me a while to get this post together).  It shows other examples of using the resulting LinkedView properties.  And, there is good info in the PowerCLI lab guide from the 2011 VMworld labs.  The PowerCLI Blog post about PowerCLI Lab at VMWorld 2011 links to the lab manual PDF.  See pages 91-93.

How much faster is your script about to be?

27 August 2012

Power Saving, PSODs, ESXi 5, and Intel E7 CPUs

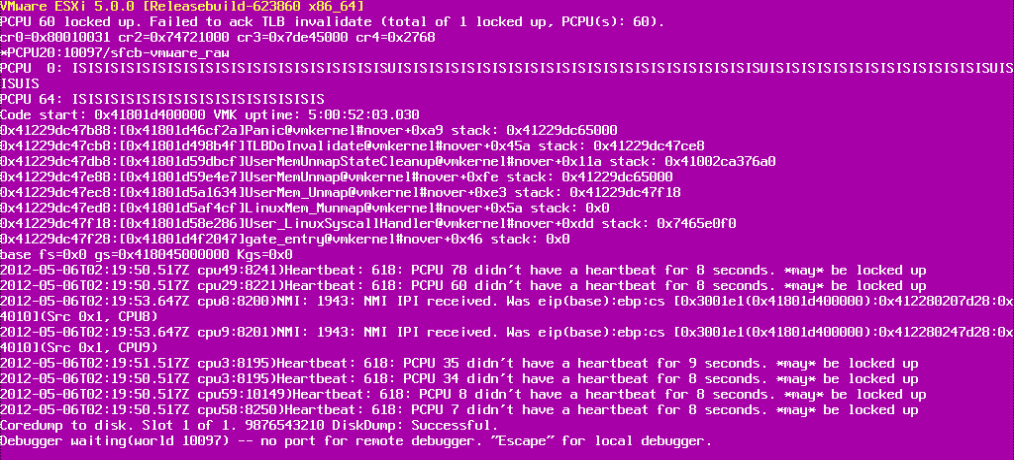
Strangely enough, I have not found much on the Internet about this particular issue:


Why is that strange?  Primarily because I have a hard time believing we are the only ones using ESXi 5.0 U1 on HP DL580 G7 servers, which appears to be one of the combinations where you would have this issue.  And actually, the problem is apparently more widespread than that.  Rumor is that it affects any server with the Intel Xeon E7 or 75xx CPU in it.  By now you are surely wanting more details.  Read on...

At a client site, we started receiving new HP DL580 G7 servers.  The first use was for VDI and in that environment we weren't (and still aren't) running ESXi 5 yet.  Those happened to have the Intel X7560 CPUs.  Let's ignore that for now.  Later we started deploying new HP DL580 G7 servers with the Intel E7-L8867 in the server environment, which was already running ESXi 5.0 U1.  This is when the problems began.  At seemingly random intervals, we'd receive the PSOD shown at the top of this post.  Time for an SR to VMware.

In short, new power management features (in the form of CPU throttling as I understand it) were added with ESXi 5 and VMware attempts to utilize them by default.  In our case, we have our BIOS set to a mode that is supposed to not allow the OS (ESXi) any control over the CPU settings, but it does not seem to matter in this case.  Per VMware, even in that scenario, SMIs (System Management Interupts) are still generated and the CPUs are not responding to them in a timely fashion (hence the "didn't have a heartbeat" messages in the PSOD message) and that's when VMware triggers the PSOD.

So at this point I felt like VMware was pointing the finger at HP because they said their internal PR only listed HP DL580 G7s as the affected servers.  Later on it seemed HP was pointing the finger back at VMware.  I, of course, had a support case open with both vendors and at one point HP released a new BIOS update that was rumored to address the problem.  The release notes read:

Problems Fixed:
Addressed a processor issue with Intel Xeon 7500-series Processors and Intel Xeon E7-series Processors that may result in unpredictable system behavior including application level errors, system hangs, Windows blue screens, Linux kernel panics, or a VMware ESX Purple Screen of Death (PSoD).  This issue is not unique to HP ProLiant servers and could impact any system using affected processors.  This revision of the System ROM contains an updated version of Intel's microcode for affected processors that addresses this issue.  The fix for this issue does not impact performance.  Due to the potential severity of the issue addressed in this revision of the System ROM, this System ROM upgrade is considered a critical fix.  HP strongly recommends an immediate update to firmware revisions with required critical fixes.

At this point I was very excited thinking that someone is actually addressing the issue.  Unfortunately, I received a PSOD on one of the servers in less than 24 hours after applying this BIOS update.  Maybe the issue with the Intel CPUs the release notes speak of was something entirely different.

From the beginning, both VMware and HP had a workaround I could apply, but as our servers were not in production yet, I wanted to spend the extra time troubleshooting the issue in hopes for a proper, long-term fix.  But, fast-forward to the end, VMware eventually started getting reports of other vendors' servers being affected--also with the Intel Xeon E7 CPU.

So the bottom line is, VMware has decided that they are going to just disable the power management features that are causing this issue as of ESXi 5.0 U2 when it is released.  Supposedly the code is being re-written for ESXi 6.0 and they are confident the issue will be resolved.  In addition, I was told they aren't even completely sure it will only affect the aforementioned Intel Xeon E7 / 75xx CPUs, so we've made the decision to disable the power management feature on all of our servers.

The setting to disable is an advanced VMkernel boot setting that can be found under the "Software > Advanced Settings > VMkernel > Boot" section and is named "VMkernel.Boot.usePCC" (PCC apparently stands for Power Collaborative Control).  Simply uncheck that option if using the vSphere Client to make the change.  VMware claims this requires a reboot to take effect, though I've seen no indication that this is the case.  Of course, vNugglets.com uses PowerCLI to make the change at build time with the following one-liner:

Set-VMHostAdvancedConfiguration -VMHost <ESXi host name> -Name "VMkernel.Boot.usePCC" -Value $false

However you prefer to do it, if you use Host Profiles, you'll need to keep one more thing in mind.  By default the Host Profile setting "Power system > CPU Policy" is set to "Balanced" if created from a default build of ESXi 5, but if you were to make the above change and then you created the Host Profile from the host, it would be set to "User must explicily choose the policy option" (and yes, that's a VMware typo, not mine).  If you are going back and retroactively changing all your hosts to disable PCC you may find your hosts are out of compliance with the attached Host Profile as it is expecting whatever power management policy you had previously specified and that feature is essentially disabled now.  As a matter of fact, if you tried to apply the Host Profile with a "Power system > CPU Policy" set against a host with PCC disabled, you'd see an error message like so:


To get around this, you'll need to either update the Host Profile from the modified reference host, or simply edit the Host Profile and change the "Power system > CPU Policy" value to "User must explicily choose the policy option" as hinted at earlier.  Then you should be able to re-apply the Host Profile to the affected hosts and it'll disable the option for you, or you can just script it with PowerCLI and verify the hosts are now compliant with your freshly updated Host Profile.

Hopefully this blog post helps someone else that may run into this particular issue with the Intel E7 CPU on ESXi 5.0 U1.

05 August 2012

Indy VMUG Demo Day 2012 PowerCLI Lab

We, as VMUG members in Indianapolis, IN, volunteered to create a PowerCLI lab for this year's Demo Day event.  This post is not to talk about the number of hours we put into it, or how awesome it was (that goes without saying), but is to talk just a bit about the lab guide, make it available, and to share a bit of the on-the-spot code we wrote to manage the lab environment.

The goal of this lab was to continue on from last year's lab, the PowerCLI lab from Demo Day 2011.

This year's lab starts out with some 101/102-level types of exercises and info, and then progresses into 200-level PowerCLI (and maybe a bit beyond).  I cut off the lab guide at thirty (30) pages -- there is so much to cover, and thirty pages got us through about 75% of the material we outlined to discuss.  Now we have leftovers for next time.

This year's lab guide is available at:

http://static.vnugglets.com/vmugdd2012/

and, if you want it for your offline reading pleasure, it is available for download at:

http://static.vnugglets.com/files/VMUGDemoDays2012-PowerCLILabGuide.zip

Have a look.  There are some lab-environment-specific items in the guide, like vCenter server names, VM Host names, VM names, etc., but the knowledge still carries/shines through.  If there are things that do not make sense or on which you have questions, hit us up -- let us know.

The environment the day of the event:  there was definite room for improvement.  The infrastructure was not put in until the day before the event, which makes building it out a bit of a rush, and does not provide for much capacity/performance testing.  Unfortunately, the user experience suffered due to sub-optimal infrastructure performance.

As for managing the lab -- setting up vApps, configuring the View desktops from which users accessed their individual labs, resetting lab environments when users were done with their lab, etc., we had a running doc in which we put code snippets that we used throughout the day.  I have posted it below.

Keep in mind, this is not a polished set of code, not a top-shelf stack of command, not a suggestion on how to run your show -- it is what evolved the day of the event.  We are posting it here for the entertainment/educational value, to show the answer to the "how did you do that on the day of the event?".  So, for fun, here is the mostly-raw code we came up with and used.  Enjoy:
## various code snipplets used in course of managing lab env.
## vNugglets, Jul 2012

## get the vC admin creds
$credVCAdmin = Get-Credential administrator

Connect-VIServer vmug-vc01 -Credential $credVCAdmin


## to start SSH on VMHosts
Get-VMHost | Get-VMHostService | ?{$_.Key -eq "TSM-SSH"} | ?{$_.Running -eq $false} | Start-VMHostService -Confirm:$false
## to stop SSH on VMHosts
Get-VMHost | Get-VMHostService | ?{$_.Key -eq "TSM-SSH"} | ?{$_.Running -eq $true} | Stop-VMHostService -Confirm:$false


## get creds for ESXi hosts
$credESXiRoot = Get-Credential root

## arr of all VMHosts names
$arrVMHostNames = Get-VMHost | %{$_.Name}

## cmd to add the given line to the config file on VMHosts
$strCmdToRun = "echo 'vhv.allow = ```"TRUE```"' >> /etc/vmware/config"
## cmd to echo out the config file
#$strCmdToRun = "cat /etc/vmware/config"
$arrVMHostNames | %{plink.exe -l root -pw rootPasswd $_ $strCmdToRun}


## added add'l portgroup to the std vSwitch0
Get-Cluster | Get-VMHost | Get-VirtualSwitch -Name vSwitch0 | %{New-VirtualPortGroup -VirtualSwitch $_ -Name PowerCLI-32 -VLanId 132 -Confirm:$false}
Get-Cluster | Get-VMHost | Get-VirtualSwitch -Name vSwitch0 | %{New-VirtualPortGroup -VirtualSwitch $_ -Name SRM-32 -VLanId 232 -Confirm:$false}


###############
## clone vApps
## name of cluster in which to make vApps
$strVDIAndMgmtClustername = "VDI and Management"
## prefix name of the vApp
#$strVAppNamePrefix = "SRM"
$strVAppNamePrefix = "PowerCLI"
## the name of the source vApp to clone
$strSourceVAppName = "base_PowerCLI_done"
#$strSourceVAppName = "base_SRM-00_CLONE"

## clone the vApp
21..25 | %{
    $strNewVAppName = "$strVAppNamePrefix-{0:d2}" -f $_
    #$dstToUse = Get-Datastore vapp-vmfs* | sort FreeSpaceMB -Descending:$true | select -First 1
    $dstToUse = Get-Datastore vapp-vmfs* | Get-Random
    New-VApp -Name $strNewVAppName -Location (Get-Cluster $strVDIAndMgmtClustername | Get-VMHost | Get-Random) -Datastore $dstToUse -VApp $strSourceVAppName -RunAsync
} ## end foreach-object

## when clones are done, can move the vApps to the given folder
$strFolderToWhichToMoveVApp = "${strVAppNamePrefix}_vApps"    ## vApp inventory folder is PowerCLI_vApps or SRM_vApps
$oDestFolder = Get-Folder $strFolderToWhichToMoveVApp
Get-VApp "$strVAppNamePrefix*" | ?{$_.ExtensionData.ParentFolder.ToString() -ne $oDestFolder.Id} | Move-VApp -Destination $oDestFolder

## set proper NetworkName for NIC on VMs in the vApps (portgroup names match the vApp names); -NetworkName param is cASeSensitIVe!
21..25 | %{
    $intLabNumber = $_
    $strVAppName = "$strVAppNamePrefix-{0:d2}" -f $intLabNumber
    Get-VApp $strVAppName | Get-VM | Get-NetworkAdapter | Set-NetworkAdapter -NetworkName $strVAppName -Confirm:$false 
} ## end foreach-object

## end clone vApps
###############


###############
## prep vApps
## take snapshots of vApp VMs -- do in PoweredOn or PoweredOff state?
#$strVAppNamePrefix = "SRM"
$strVAppNamePrefix = "PowerCLI"
21..25 | %{
    ## make vApp name
    $strNewVAppName = "$strVAppNamePrefix-{0:d2}" -f $_
    Get-VApp $strNewVAppName | Get-VM | New-Snapshot -Name "0" -Description "Initial state" -Memory -Quiesce -Confirm:$false -RunAsync
} ## end foreach-object

21..25 | %{$strNewVAppName = "$strVAppNamePrefix-{0:d2}" -f $_; Get-VApp $strNewVAppName | Start-VApp -Confirm:$false -RunAsync}
## for the PowerCLI stuff -- restart the ESXi VMs so that vC shows them as powered on
#21..25 | %{$strNewVAppName = "$strVAppNamePrefix-{0:d2}" -f $_; Get-VApp $strNewVAppName | Get-VM esxi* | Restart-VM -Confirm:$false}
21..22 | %{
    ## make vApp name
    $strNewVAppName = "$strVAppNamePrefix-{0:d2}" -f $_
    Get-VApp $strNewVAppName | Get-VM | New-Snapshot -Name "1" -Description "Powered on" -Memory -Quiesce -Confirm:$false -RunAsync
} ## end foreach-object
## end prep vApps
###############


$strVDIVMsBaseName = "PowerCLI"
21..25 | %{Get-VM $("vm-${strVDIVMsBaseName}-{0:d2}" -f $_)} | %{
#Get-VM "vm-${strVDIVMsBaseName}-*" | %{
    $strVMName = $_.Name
    Get-NetworkAdapter -VM $_ -Name "Network Adapter 2" | Set-NetworkAdapter -NetworkName $strVMName.Trim("vm-") -Confirm:$false -WhatIf
} ## end foreach-Object
#-- CHECK ON POWERCLI-06, SRM-03, SRM07 -- not sure 2nd nic is on right virtual network


###############
## reset vApp for next user -- revert all VMs in the vApp to snapshot
$strVAppToReset = "PowerCLI-03"
$strSnapshotName = "1"

$vappToReset = Get-VApp $strVAppToReset
## stop VMs in vApp
#$vappToReset | Get-VM | Stop-VM -Confirm:$false
$vappToReset | Get-VM | Set-VM -Snapshot $strSnapshotName -Confirm:$false

## start the vApp if reverting to snapshot 0 (if snapshot 1, the VMs were on)
#$vappToReset | Start-VApp -Confirm:$false
Get-VM "vm-$strVAppToReset" | Restart-VMGuest -Confirm:$false
## end reset vApp -- revert all VMs in the vApp to snapshot
###############


## reporting stuff
## show snapshots for each vApp
11..20 | %{Get-VApp powercli-$_} | %{$strVAppName = $_.Name; Get-VM -Location $_ | Get-Snapshot | Select @{n="vapp";e={$strVAppName}},Name,VM}

And, other guys besides Allen and Matt of vNugglets.com and the VMUG team that put in work to make the labs happen:  big Joe Filippello (@joefilippello, filippello.com) and Jaron Hilger (@hilgertech).  Thanks, guys.

02 July 2012

VMware View reporting -- PowerShell without Broker-based cmdlets -- Part 0

The need:  reportability/manageability of VMware View environments
The tool from VMware:  PowerShell Integration with VMware View -- a PowerShell snapin provided with VMware View.

Some problems:
  • must be used on the Broker server on which VMware View Connection Server software is running (local or via PSRemoting)
  • slow
  • has not been updated since View 4.5 release
  • slow!
So, I checked around for alternatives, and were eventually put onto the local ADAM instance that runs on each Connection Server.  After some inspection/investigation (thanks, Sysinternals AD Explorer), I found how to use the data in the ADAM database to return valuable VMware View environment information in a timely fashion.

LDAP and Quest's AD cmdlets?  Sounds good.

Overview:  by using Quest's Get-QAD* cmdlets and querying the local ADAM database on a Connection Server, most any VMware View info can be had.  As for speed -- with the proper planning, the reporting we are doing is far faster than using the standard View cmdlets on a Connection server -- in some cases, an order of magnitude faster, in some cases, an even greater increase!  A quick example of the amount of time for getting pools, their template, and their description for an environment with about 75 pools by each method:
using standard View cmdlets on the Brokerabout 70 seconds
querying LDAP to grab the desired infoless than one (1) second!

Obviously, some serious speed gains to be had.  More on those results later.

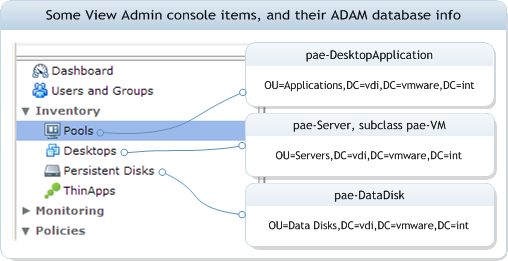
To dig in:  A couple of key organizational units ("OUs") and basic object types/properties that help along the way to being able to mine this info:
DescriptionValue
pool objects' OU distinguished nameOU=Applications,DC=vdi,DC=vmware,DC=int
pool objectClasspae-DesktopApplication
pool property that specifies the pae-ServerPool object which contains additional pool settings<poolObject>.{pae-Servers}
pool property that specifies the pool's display name<poolObject>.{pae-DisplayName}

Further info about row three -- the "pae-ServerPool" LDAP objects hold further info about the actual View pool with which they are associated.

And, so as to show the ADAM DB object types and OUs for some items, I labeled a snippet of a screenshot from the View Admin console:
labeled View Admin web console screenshot snippet

So, to get some pool info (display name, description, template/parent VM name) for VDI pools using Get-QADObject:
## some juicy properties to retrieve with the pae-ServerPool (Pool additional info) objects
$arrIncludedProperties = "pae-DisplayName,description,pae-VmTemplateName,pae-SVIVmParentVM,Name".Split(",")

## use Get-QADObject to connect to the given ADAM instance (on the given Connection Server), retrieve objects and return info
Get-QADObject -Service myConnectionServer.domain.com -DontUseDefaultIncludedProperties -IncludedProperties $arrIncludedProperties -LdapFilter "(objectClass=pae-ServerPool)" -SizeLimit 0 | Sort-Object "pae-DisplayName" | Select-Object Name, "pae-SVIVmParentVM"

which returns some info like:
...
Name                pae-SVIVmParentVM
----                -----------------
testPool            /datacenter2/vm/XP/Imgs/templV101
testPool2           /datacenter2/vm/XP/Imgs/4v101
test-2011           /datacenter0/vm/XP/Imgs/hangarV101
jamPool             /datacenter0/vm/XP/Imgs/slaughterv101
...
Note: "pae-SVIVmParentVM" is the path to the parent VM for a linked-clone pool

If you are not quite following the -LdapFilter parameter in the code above, it is, as the parameter name suggests, a way to filter the objects returned in the query.  In this case, it helps to return just the items that are the "additional info about pools and their settings" objects.  A quick but good bit about LDAP query syntax is available in the Search and Compare section about LDAP at wikipedia.org.

Ok, good start. Now, put that into a function, and try a few other calls:
## Script purpose:  function to get pool info (display name, description, template/parent VM name) for VDI pools
## Author:  vNugglets.com -- Feb 2012
function Get-VNVDIPoolTemplateInfo {
    #Requires –PsSnapIn Quest.ActiveRoles.ADManagement
    param (
        ## one of the connection servers of the given VDI environment
        [string]$connectionServerName_str = "someBroker.domain.com"
    ) ## end param

    $arrIncludedProperties = "pae-DisplayName,description,pae-VmTemplateName,pae-SVIVmParentVM,Name".Split(",")
    Get-QADObject -Service $connectionServerName_str -DontUseDefaultIncludedProperties -IncludedProperties $arrIncludedProperties -LdapFilter "(objectClass=pae-ServerPool)" -SizeLimit 0 | Sort-Object "pae-DisplayName" | Select-Object $arrIncludedProperties
} ## end fn
Some sample usage:
## Gets template-based pools and their description and template info
PS C:\> Get-VNVDIPoolTemplateInfo -connectionServer someBroker.domain.com | ?{$_."pae-VmTemplateName"} | select pae-DisplayName,pae-VmTemplateName

pae-DisplayName             pae-VmTemplateName
---------------             ------------------
Sharepoint Crew             /datacenter0/vm/XP/Templates/myOldTemplate0
Developer POC               /datacenter0/vm/XP/Templates/myTemplate1
...
## gets VDI pools whose linked clone "parent" property is like "*v101", gives pool ID and the linked clone parent VM info
PS C:\> Get-VNVDIPoolTemplateInfo -connectionServer someBroker.domain.com | ?{$_."pae-SVIVmParentVM" -like "*v101"} | select Name,pae-SVIVmParentVM,description

Name                pae-SVIVmParentVM                       Description
----                -----------------                       -----------
testPool            /datacenter2/vm/XP/Imgs/templV101       Temporary testing pool...
testPool2           /datacenter2/vm/XP/Imgs/4v101           Old "next-gen" pool for..
...

As for those speed gains reported above -- part of why querying the LDAP directory (ADAM DB) is soo much faster than the standard View cmdlets is the focus/scope of the queries.  Using the View cmdlets pulls back a prescribed amount of data about the objects in question, pools in this example. Cheers to VMware for providing the cmdlets.  But, there is some work to be done with them, still.  Meanwhile, specifying just the necessary properties/objects/attributes to get the desired info helps keep things fast (FaF).  The actual results of the speed tests performed:
## on broker console, native cmdlet
PS C:\> Measure-Command {Get-Pool | select pool_id,parentVMPath,description}
...
TotalSeconds      : 72.4010917
...
## on remote machine using vNugglets function
PS C:\> Measure-Command {Get-VNVDIPoolTemplateInfo -connectionServerName connectionServer.somedomain.com | select Name,pae-SVIVmParentVM,description}
...
TotalSeconds      : 0.6809141
...

What's that?  100+ times faster?  Nice.  Again, the speed gain is thanks to the planning and the upfront cost of writing the specific ADAM queries -- it is not pure magic (just only a little).

And, some of the other places on the web that talk about alternative ways to mine View data (mostly without using [slow] cmdlets local to the View Broker) that may be of interest:
Wait, there is more! But, for the sake of having a reasonable length for this post, I will save those for now. Upcoming pieces in this series include further discussion about the OUs/objects in the View ADAM DB and how to use them for looking at pool entitlees, finding out what pools use a given parent / template VM, and reporting on pool VMs and their assigned users.

06 February 2012

Change VM Boot Order via PowerShell

There was a recent question in the VMware PowerCLI community about changing the boot order for a VM (Change Boot Sequence with new Extensiondata option).  In looking into this, I found that the VirtualMachineBootOptions item has a BootOrder property with which one can change the VM's boot order (new in vSphere API 5.0).

Upon searching about to see if there were already examples of using this property for changing boot order, I found none.  There are places that talk about changing/limiting what boot devices a VM may use in order to boot from the given device, but none that dealt with changing the actual boot order on the VM.  So, I whipped out an example (that person was wanting to use the ExtensionData property of a VM object).

The BootOrder property can have four (4) different types of devices (which are VirtualMachineBootOptionsBootableDevice objects): CDRom, disk, ethernet, and floppy.

The CDRom boot device does not correspond to any particular CDRom on the VM -- per the docs, when the boot order specifies CDRom, the first CDRom with bootable media found is used.

The disk and ethernet boot devices are related to the actual VirtualDisk and VirtualEthernetCard devices on the VM by specifying the corresponding Keys for the given devices.

Here is an example of setting the boot order for a VM to NIC2, Disk1, CD:
## the VM to configure
$strVMName = "myVM0"
## the device name of the NIC to which to boot
$strBootNICDeviceName = "Network adapter 2"
## the device name of the hard disk to which to boot
$strBootHDiskDeviceName = "Hard disk 1"
## get the .NET View object for the VM, with a couple of select properties
$viewVM = Get-View -ViewType VirtualMachine -Property Name, Config.Hardware.Device -Filter @{"Name" = "^$strVMName$"}

## get the VirtualEthernetCard device, and then grab its Key (DeviceKey, used later)
$intNICDeviceKey = ($viewVM.Config.Hardware.Device | ?{$_.DeviceInfo.Label -eq $strBootNICDeviceName}).Key
## bootable NIC BootOption device, for use in setting BootOrder (the corresponding VirtualEthernetCard device on the VM has PXE enabled, assumed)
$oBootableNIC = New-Object -TypeName VMware.Vim.VirtualMachineBootOptionsBootableEthernetDevice -Property @{"DeviceKey" = $intNICDeviceKey}

## get the VirtualDisk device, then grab its Key (DeviceKey, used later)
$intHDiskDeviceKey = ($viewVM.Config.Hardware.Device | ?{$_.DeviceInfo.Label -eq $strBootHDiskDeviceName}).Key
## bootable Disk BootOption device, for use in setting BootOrder (the corresponding VirtualDisk device is bootable, assumed)
$oBootableHDisk = New-Object -TypeName VMware.Vim.VirtualMachineBootOptionsBootableDiskDevice -Property @{"DeviceKey" = $intHDiskDeviceKey}

## bootable CDROM device (per the docs, the first CDROM with bootable media found is used)
$oBootableCDRom = New-Object -Type VMware.Vim.VirtualMachineBootOptionsBootableCdromDevice

## create the VirtualMachineConfigSpec with which to change the VM's boot order
$spec = New-Object VMware.Vim.VirtualMachineConfigSpec -Property @{
    "BootOptions" = New-Object VMware.Vim.VirtualMachineBootOptions -Property @{
        ## set the boot order in the spec as desired
        BootOrder = $oBootableNIC, $oBootableHDisk, $oBootableCDRom
    } ## end new-object
} ## end new-object

## reconfig the VM to use the spec with the new BootOrder
$viewVM.ReconfigVM_Task($spec)

To display the VM's BIOS boot order after the update (not terribly obvious from the output):
PS C:\> ## get the updated View info about the given property
PS C:\> $viewVM.UpdateViewData("Config.BootOptions.BootOrder")
PS C:\> ## display the BootOrder
PS C:\> $viewVM.Config.BootOptions

BootDelay        :
EnterBIOSSetup   :
BootRetryEnabled :
BootRetryDelay   :
BootOrder        : {4001, 2000, VMware.Vim.VirtualMachineBootOptionsBootableCdromDevice}
DynamicType      :
DynamicProperty  :

...where 4001 is the DeviceKey of the second virtual NIC in the VM, and 2000 is the DeviceKey for the first virtual disk.

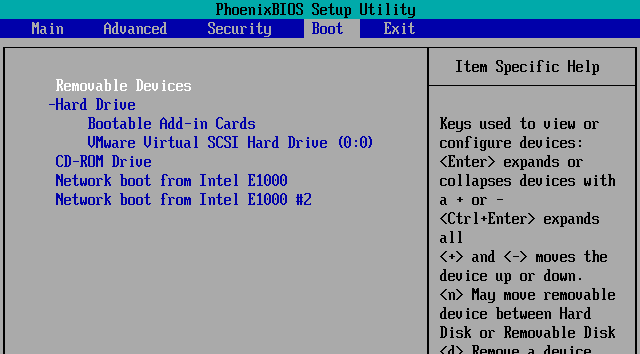
Original BIOS Boot settings:

BIOS Boot settings after updating them with the script:

Notes about setting the boot order in this manner:  once you have done so on a VM, it appears that the boot order can only be changed via script.  Notice in the first screenshot that one may use keys to navigate between items, whereas the second screenshot states that "All items on this menu cannot be modified in user mode". Something to keep in mind.  Additionally, this method does not seem to have control over where the "Removable Devices" item appears in the boot order.

Enjoy!

16 January 2012

Show Currently Connected vCenter Servers in PowerCLI 5.0.1

PowerCLI 5.0.1 was recently released and vNuggs decided to check it out. Almost immediately we noticed something was missing. PowerCLI was no longer reporting in the title bar the vCenter server(s) to which we were connected.

Example of a single connected server before PowerCLI 5.0.1:


Example of multiple connected servers before PowerCLI 5.0.1:


AC decided to make a quick post to the PowerCLI community to see if others had noticed it and was hoping the PowerCLI team would respond as to whether this was intentional or not and what the future plans are for this functionality.  So far, no word from the team, but others have noticed the change as well.

However, in the meantime, we decided to solve the problem ourselves with some functions.  The first function is the one that does all the real work--ChangeTitleBar:

## Function to change title bar to reflect currently connected vCenters
## Author: vNugglets.com -- Jan 2012

function Change-TitleBar() {
    ## check to see if there are any currently connected servers
    if ($global:DefaultVIServers.Count -gt 0) {
        ## since there is at least one connected server, modify the window title variable accordingly
        $strWindowTitle = "[PowerCLI] Connected to {0} server{1}:  {2}" -f $global:DefaultVIServers.Count, $(if ($global:DefaultVIServers.Count -gt 1) {"s"}), (($global:DefaultVIServers | %{$_.Name}) -Join ", ")
    }
    else {
        ## since there are no connected servers, modify the window title variable to show "not connected"
        $strWindowTitle = "[PowerCLI] Not Connected"
    }
    ## perform the window title change
    $host.ui.RawUI.WindowTitle = $strWindowTitle
}

In line 6 the function merely checks the Count property of the array DefaultVIServers to ensure that you are connected to at least one server, then updates a variable with the new window title text in line 8. Note that we are omitting the name of the connected user.  We went this route to keep the function simple and because even VMware didn't include this info when connected to multiple servers (see screen shots above) and in the end, it is not something we find all that important/useful. It could simply be added by using the User property of the DefaultVIServers variable.

In line 12 (the "else" portion of the "if" statement) we just set the variable to what we selected as our default window title text.  Change this to your own preference (note that it doesn't bother reporting the PowerCLI version either, but that's easy enough with the Get-PowerCLIVersion cmdlet).

Finally, line 15 actually sets the window title to the defined value.  Now you just need to place this function in your PowerShell profile and make calls to it when you connect to/disconnect from VI servers.  You can do this by writing custom functions for Connect-VIServer and Disconnect-VIServer as follows:

## Modified "Connect- and Disconnect-VIServer" functions that call "Change-TitleBar" function
## Author: vNugglets.com -- Jan 2012

## Function for the "Connect-VIServer" cmdlet
function ConnectServer([string] $strVCenterName) {
    Connect-VIServer -Server $strVCenterName
    Change-TitleBar
}

## Function for the "Disconnect-VIServer" cmdlet
function DisconnectServer([string] $strVCenterName = "*") {
    Disconnect-VIServer -Server $strVCenterName -Confirm:$false
    Change-TitleBar
}

There is absolutely nothing fancy about these functions and they are not intended as direct feature-for-feature replacements of the actual Connect- and Disconnect-VIServer cmdlets.  The ConnVIServer function simply takes a string parameter and calls the actual Connect-VIServer cmdlet with that string specified as the server to connect to.  It then calls the Change-TitleBar function to do the title bar magic.  The DisconnVIServer function does the same, except in this case we've set a default parameter value of "*" just for convenience when you want to disconnect from all connected servers.  You'd merely type DisconnVIServer and it would immediately disconnect from all servers.

Lastly, it is probably a good idea to make a call to Change-TitleBar somewhere after the function definitions in your PowerShell profile.  Then it'll set the "default" title bar text as you launch PowerShell since the initial text with PowerCLI 5.0.1's initialization script just shows the name of the product and version.